
Hi everyone! It’s been much too long since I posted something!
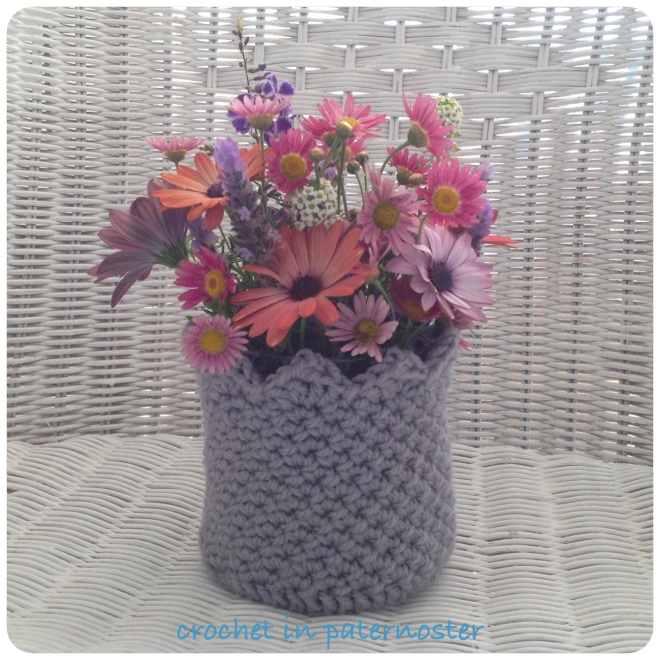
So today I am sharing a little photo tutorial for a very easy crochet basket.
I just don’t know what to call the stitch that I use? I make two single crochets into every 2nd stitch. Do you know what it is called?
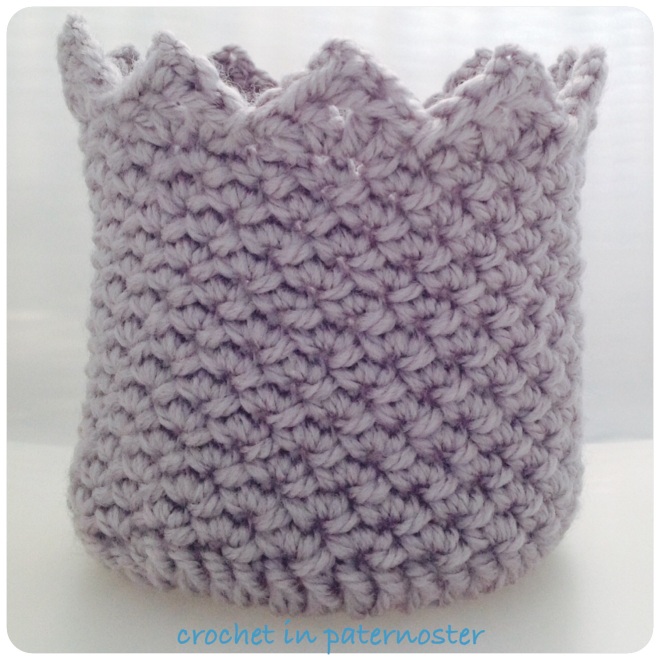
The result is a sturdy side for your basket and I quite like the rhythm of the stitches when you start going around and around.
It is winter and cold here in South Africa. And I have a cold. And the middle teenager has a cold. So I picked some flowers from our garden before I started the tutorial this morning.
| Skill Level: | Beginner/Intermediate | |
| Gauge: | for t-shirt yarn, a 12 mm or 15mm hook for any other yarn, the size recommended on the yarn label | |
| Terminology: | American (US) | |
| Dimensions: | chunky acrylic, bottom = 10cm, height = 12cm you can alter the size by adding rounds to your bottom circle and/or side rounds | |
| Requirements: | Any yarn you have in your stash basket. A crochet hook in the size recommended on your yarn label.I used a 6mm for the Chunky Acrylicand a 12 mm for the t-shirt yarn | |
| NOTES: | You need to know how to do the following:“magic circle”“how to crochet a flat circle with double crochet”If you are not familiar with the above technique, you can Google for it. You will find lots of tutorials or you tube videos to show you how. | |
| Abbreviations: | Magic Circle
Slip stitch Single crochet |
MC
ss sc |
Pattern

| Round 1 |
1. Make a magic circle
ch 2 (counts as 1 dc)
work 12 dc into the magic ring
2. close round with slip stitch in to the 1st dc
3. pull your magic ring closed and tight
[ total of 13 dc ]
Round 2
1. ch 2, 1 dc in same stitch (that would be in
the slip stitch)
2. 2 dc into every dc all around
3. one last dc into the ss where you started
(that just fills up the gap neatly)
4. close the round with a ss into your 1st dc
skipping that “ch 2” again.
[ total of 25 dc , because you added that
extra dc into the slip stitch ]
Round 3
1. ch 2, 1 dc in same stitch
2. 1 dc, 2 dc all around
in other words, you increase in every 2nd
stitch
3. you should end up with 1 dc and then you
do a last dc into the ss where you started
4. close the round with a ss into your 1st dc
skipping that “ch 2”
[ total of 37 dc ]
Round 4
1. ch 2, 1 dc in same stitch
2. 1 dc, 1dc, 2 dc all around
in other words, you increase in every 3rd
stitch
3. you should end up with 1 dc and then you
do a last dc into the ss where you started
4. close the round with a ss into your 1st dc
skipping that “ch 2”
[ total of 49 dc ]
This was the last round for the bottom
| Side |
The side is 2 sc in every 2nd stitch.
So from the bottom circle’s last slip stitch:
skip one stitch and make 2 sc into the next stitch
all around
from here on, you do not “close” / “end” the rounds
you just go around and around
after your first side round you will see your sides come up like magic!
Border
when your sides are the height you want them, you can get ready for the border by starting with a slip stitch
* skip one, 2 dc, ch 3, hdc picot back in to front loop of the 2nd dc
in next stitch, 2 dc
skip one, slip stitch *
repeat all around

Then you just slip stitch in to your first ss of the border, work your ends in and you’re done!
That’s it for now. I have used this pattern for t-shirt yarn as well. Maybe I’ll show you those baskets next time. Keep well.

Beautiful – thank you and get better soon!
Dankie Anna-Marie. Hoop jy gaan enetjie probeer?
Reblogged this on Shabbychicandromanticcrochet and commented:
Easy Peasy Crochet Basket
a great pattern via
Pingback: Easy Peasy Crochet Basket | Shabbychicandromanticcrochet
I just love it, reblogged, and share on facebook, thanks so much for sharing the pattern.Get well soon
Happy that you like my little basket ShabbyChic! Thank you for sharing.
Thank you for sharing your pattern! got to try ASAP ❤
Dis pragtig! Dankie vir die patroon!
Dankie Erica. xxx
Can’t wait to try this pattern. I want to make one a little bigger around but shorter to put my dog, Sassy’s toys in. She is a chewy little Jack Russell and if she grabs this basket and runs off with it, toys and all, I don’t think it would be as bad as if she grabbed a regular basket made of reed! Thanks for posting
Would love to see your basket Kitty!
Hope Sassy likes it.
Lovely !
Anna
Thank you Anna.
You have beautiful doilies on your blog.