

‘n beginner foto patroon vir die twistie
a beginner photo tutorial for the twisty neck warmer
(Möbius) (mobius) (moebius) (cowl) (infinity scarf)
Na die vorige twisty patroon (wat 3 uur die nag gepost was!) was daar ‘n paar beginners wat gesukkel het met die twist gedeelte. Dis so maklik om te verduidelik as jy langs iemand sit. Maar moeilik met ‘n foto of met geskryf. Ek het nog ene gedoen maar kon nog steeds nie die twist mooi uitwys nie. Toe het ek rondgespeel met verskillende kleure wat die verskillende rondtes mooi uitwys. En lank gewonder hoe mens die “twist” mooi kan uitwys op ‘n soort van 3D manier. Ek het nie een van daai fancy kleremaak poppe of modelle sodat ek die twisty kan “drape” nie. En Anya gaan ook nie stil sit vir ‘n duidelike stap vir stap foto nie! Toe leen ek maar een van haar wit emmertjies waarin sy haar diertjies bêre.
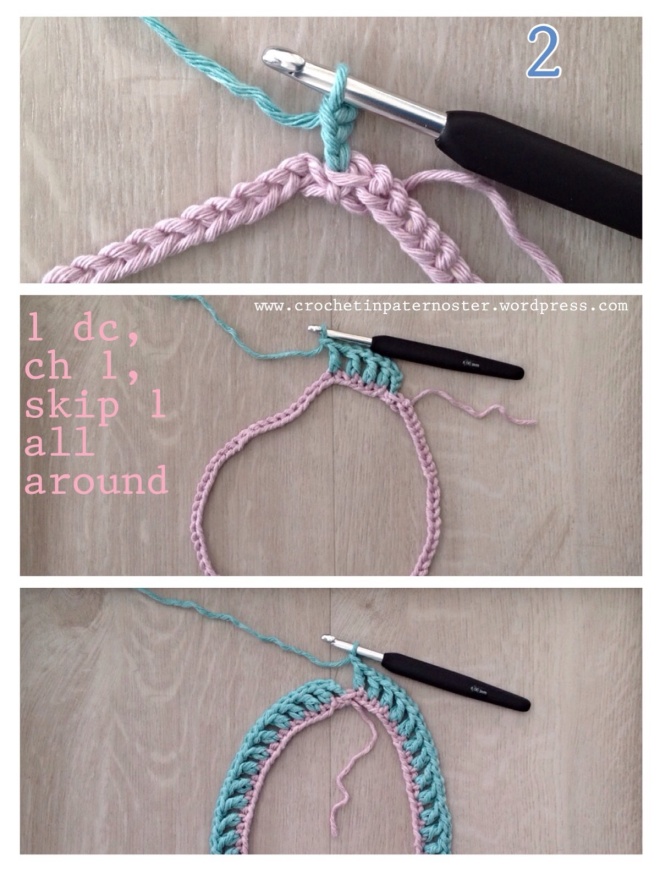
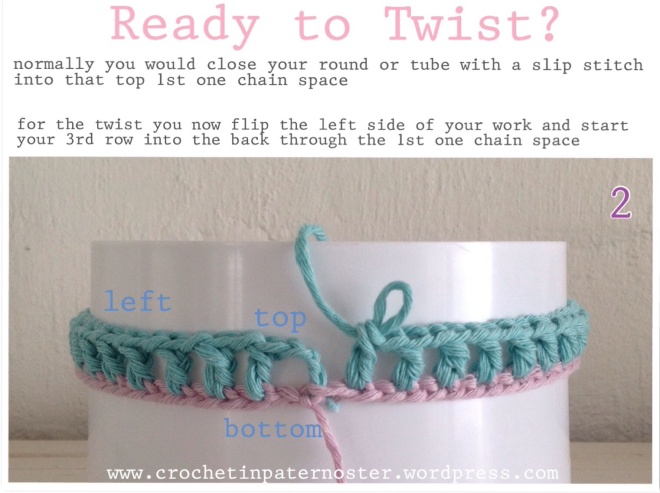
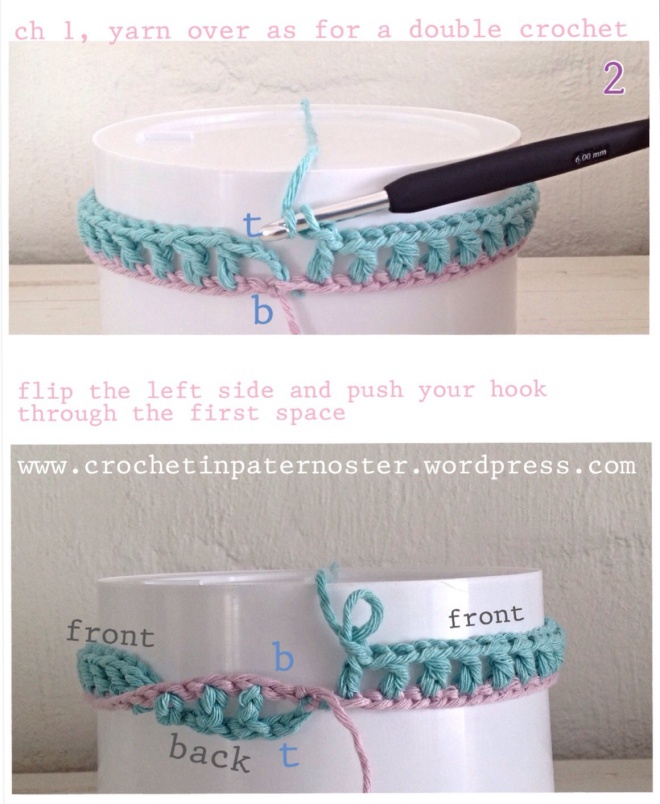
After my previous twisty tutorial, there were people that struggled with the actual twist part/action. It was quite difficult for me to describe it in words and with a “flat” photo. I racked my brain a bit to find ways to explain it better. Anya’s little white bucket came in handy to do a 3D photo for the actual twist. And then the different colours for each row helped to show that from the 2nd row onwards one round magically appears on each side of your beginning chain.

The little white bucket! Handy storage for small animals. And very handy for a 3D photo of a neck warmer twist!
In searching for photos to try and explain the twist I’ve realised that my twisted neck warmer could also have other names like:
Möbius or Moebius Scarf
Infinity Scarf
Infinity Cowl
I want to try and explain what a Möbius/mobius is before you start with your twisty.
I quote From Wikipedia
http://en.wikipedia.org/wiki/M%C3%B6bius_strip
“The Möbius strip/band is a surface with only one side and only one boundary component. A model can easily be created by taking a paper strip and giving it a half-twist, and then joining the ends of the strip together to form a loop.”
That sort of explains it. But I wanted a clear picture as well. So I made a small moebius to show you what it looks like.

I hope that helps you visualise how your twisty is going to end up
I used 2 balls of Strawberries&Cream
which is 50% Recycled Cotton and 50% Acrylic
and a 6mm crochet hook
1 ball is 50g and approximately 75m / 82 yds
You can use any double knit yarn with the hook size recommended on the label. If you look at the previous Twisty posts you can see all the different types of yarn everyone used. You can also use 2 strands of yarn together with a 10mm or even a 12mm hook.
https://crochetinpaternoster.wordpress.com/2014/06/28/twisted-neck-warmer/
https://crochetinpaternoster.wordpress.com/2014/08/14/julle-twisties-your-twisties/


A trip to nearby Langebaan to have some Lemon Meringue and a cappuccino . And testing the yarn out with different hook sizes.

Back at home I decided the 6mm hook works best.
I use US terminology for this pattern
|
Afkortings in Afrikaans |
Abbreviations in US terms |
Abbreviations in UK terms |
|||
|
ks |
kettingsteek |
ch |
chain |
ch |
chain |
|
gs |
glipsteek |
sl st |
slip stitch |
sl st |
slip stitch |
|
kb |
kortbeen |
sc |
single crochet |
dc |
double crochet |
|
hlb |
halwe langbeen |
hdc |
half double crochet |
htc |
half treble crochet |
|
lb |
langbeen |
dc |
double crochet |
tr |
treble crochet |
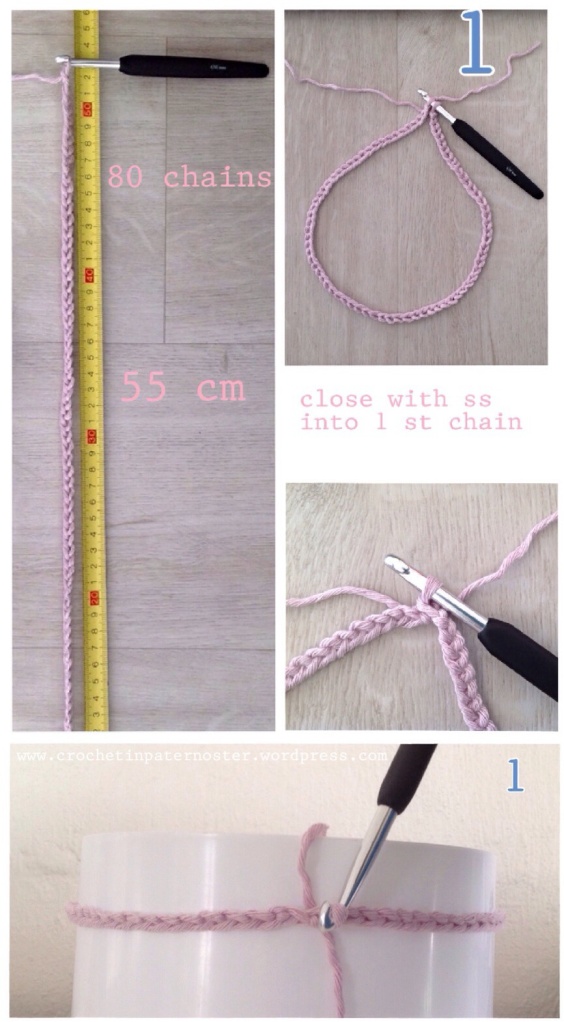
You can change your number of chains you start with according to you yarn thickness and hook size. As long as your chain is 55cm. You can also make your chain longer if you want a looser neck warmer.


To end your neck warmer evenly you would taper it down with the last few stitches. 1dc,ch1, 1 hdc,ch1, 1sc ,ch1, slip stitch. Then you can add a pretty border if you want to.

I did this one with the pink border first. And then had enough yarn left from the 4 balls to make another one.

We took the twisty for a photo shoot.

I love my Strawberries&Cream Twisty. Anya insists on blue twisties!
Maybe I can show you how I did the border in a next post?
Thanks for visiting.
Hope to see you again soon.


Wonderful … selfs ek kan sien waar ek oorspronklik gefouteer het!
Adorable and enjoyed your post very much! Sharing! Sandy
Great! Thank you Sandy! Love all the posts and ideas you share on your page!
Oh thank you so much!! I am enjoying my site, just need to do more, and more! Sandy
Cool – BAIE dankie – wil dit nog heeltyd probeer ma nie kans gesien nie ( hekel ma stadig) – maar dit Lyk of ek dit dalk ook sal kan regkry. Kersgeskenke hier kom ons. 😉 wys grt ASB die border vgl keer! 💐
Groot plesier Mariane. Enjoy!
Ah this is so pretty scarf in a wonderful colours with so handy tutorial and the information how to. Thank you so much!
Olga~
glad you like it Olga!
Yes Annekewiese this tutorial explains it much better to me a visual person:) Thanks for explaining it more simply!
Yay! Glad to help Mama Spins!
Dankie, het twistie gemaak, lyk of hy effens losser om my nek sit as joune, maar toema… Ek wil graag klaarmaak en kan nie reg afkyk by jou randjie nie… Een ry single crochet, vlg ry drie slip stitches, maar hoe op dees aarde maak jy die bobbelkie… dankie, jyt mos belowe jy gaan wys sometime…. mooi dag
Hi Elna
Ek het op Crochet in Paternoster se Facebook blad 2 fotos in die Twisty Album gesit wat wys hoe die randjie gedoen word.
Hoop jy kry dit.
Groete
Anneke
Dankie….
Plesier Elna
Beautiful
Thank you Antoinette! Are you going to make one?
I stumbled onto your site as I wasn’t understanding the start of the möbius from other tutorials. Your pictures clicked and I completed one this evening. Thanks for your kind heart in sharing your knowledge.
Yay!!! I would love to see your möbius Marie!
Hi! Thank you for this fun and beautiful pattern. May I ask what you mean by tapering the work down with the last few stitches. 1dc,ch1, 1 hdc,ch1, 1sc ,ch1, slip stitch?
Also… do you have any tip for neatly hiding all those loose ends?
Thanks so much!
Hi Lan
The tapering helps with ending (closing) the last round more smoothly.
I changed colours using the “fisherman’s knot”.
Kind regards
Anneke